Upgrades and 'improvements'
Install hot-start kit
Disclaimer The TVR Car Club will not accept responsibility for any damage caused to any vehicle as a result of using this information.
The Hot-Start Problem
This problem is fairly common among TVR Griffith and Chimaera owners. It often occurs when attempting to re-start the car shortly after it was stopped in warm conditions (eg. when filling up with petrol).When you turn the key power is sent to the starter motor. However one of the wires in the chain isn't quite up to the job so in hot conditions the resistance in the wire builds to the point where insufficient power gets to the starter motor.
The Solution
David Beer at Mod-Wise sells a kit which uses a relay to bypass the faulty circuit. The kit is cheap, well made and simple to install. Below is a summary of the installation process that I used on my car.
Installation
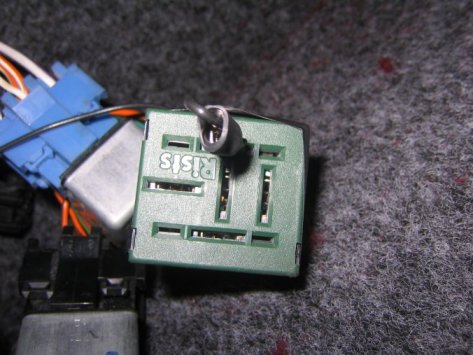
The kit comes in the form of a relay with a collection of wires attached and an LED test lamp.1) The relay requires a -ve source, David recommends using the earth feed on the empty green connector on the loom in the passenger foot well. You can find the correct slot as the wire going into it is solid black. You can double-check it by inserting the spade connector on the kit into the slot and then attaching the clip on the LED to that. Touch the other end of the LED to the +ve side of the battery to confirm that you have the correct slot.
My -ve connection:
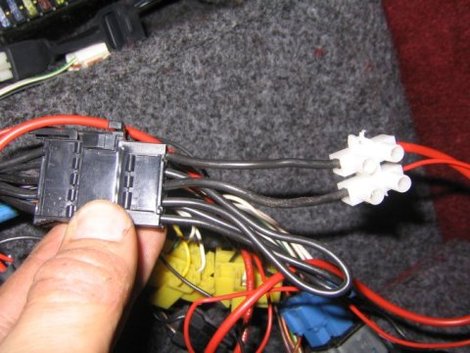
2) Start the engine and locate the pair of black wires (looped together) that aren't live when the engine is running. In the next photos you can see the connectors (and the pair that worked for me). Using the probe on the LED with the -ve clip in place, the bulb will light up for two of the three pairs.
3) Stop the engine, cut that loop, strip the wires back and put one into each of the terminal-block connectors (see above image).
4) Attach the red wire to a +ve feed. I went for the battery terminal. I was worried that the hole in the 'O' connector wouldn't be big enough but it was fine.
5) Test. Make sure that the black spade connector is secure (you can remove the LED clamp now). If the starter motor doesn't engage switch around the wires in the terminal block.
6) Tidying up. I taped the wire to the +ve battery terminal to the existing wires to prevent them coming off during a battery change. I also put some tape around the terminal block to reduce the chance of a short. Finally I used some tape to secure the black earth wire into the green terminal (see image 1). I'm tempted to put this wire straight to the battery too as I'm concerned that the spade might come out.


