
Technical info
A collection of hopefully useful articles and external links about the TVR Chimaera
Setting up cam timing
A link to some useful info on Rover V8 Mods and details of how to set up cam timing - Setting Up Cam Timing...
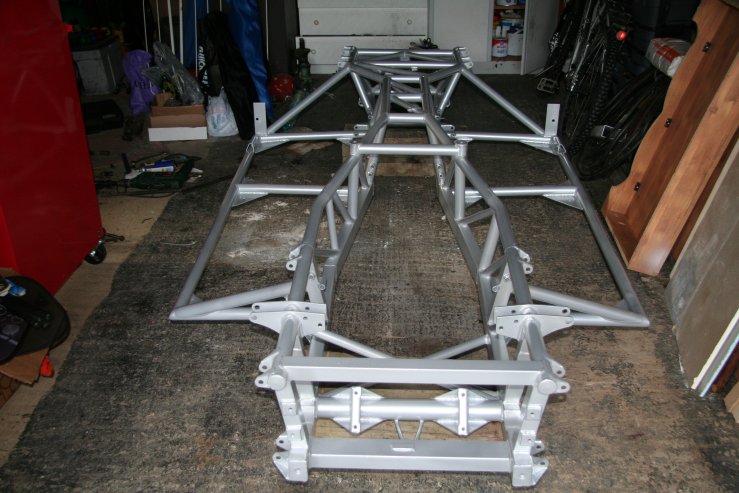
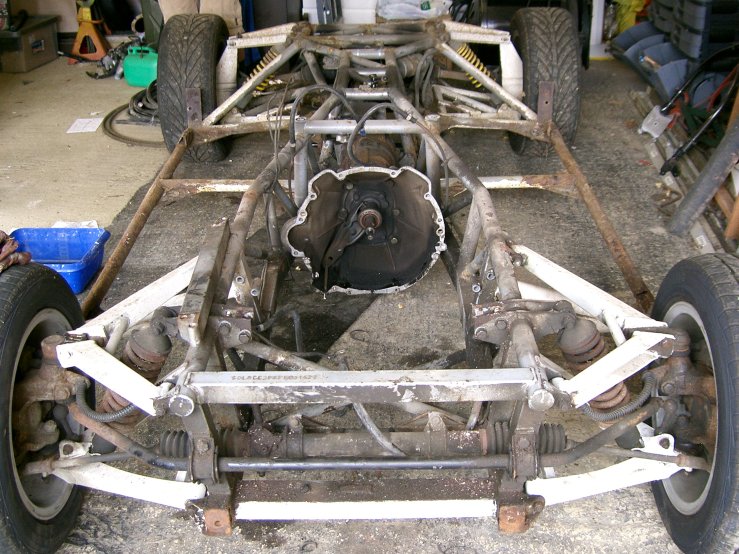
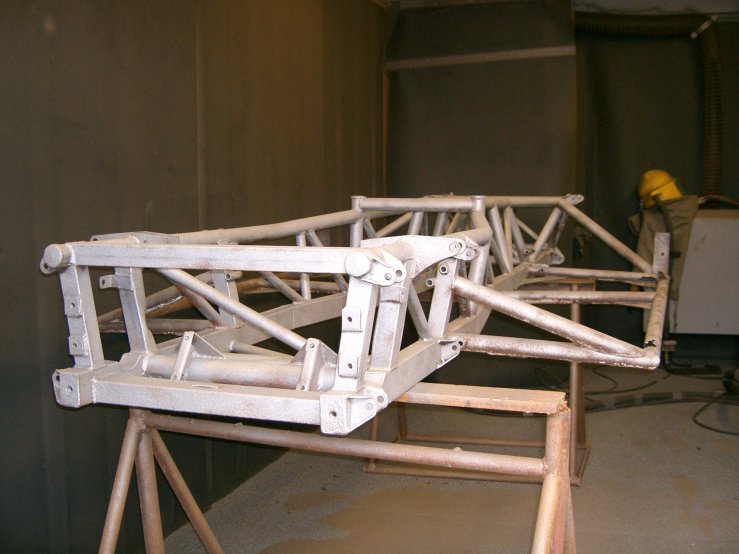
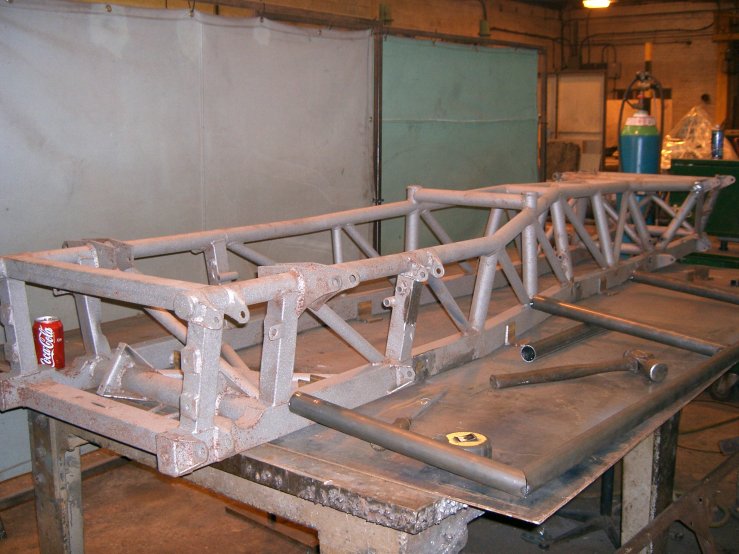
Chassis restoration
Some images from Jonathan's Chimaera chassis restoration project.
How to speed up Chimaera electric windows
Reproduced with the kind permission of Keith Sturley.
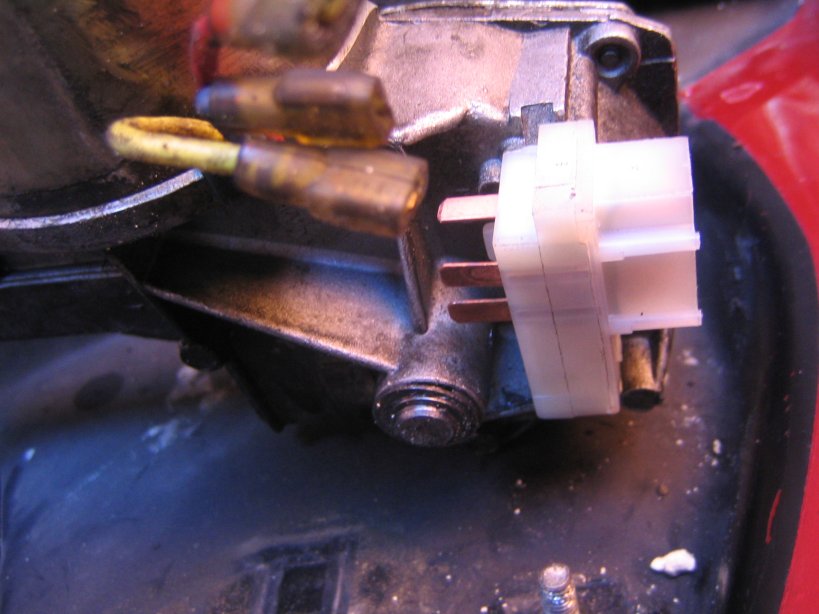
Having suffered slow electric windows on my Chimaera for some time I decided to take action.
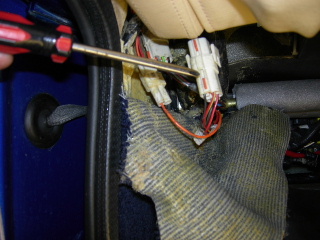
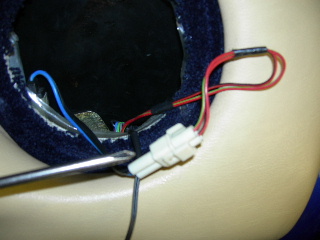
Just in front of the door there are some electrical connector blocks (as shown in the photo)
Using a meter with the probe into the connector whilst operating the window switch I discovered that I only had 11.5 volts at this point compared with 12.5 when measuring directly onto the battery. I thought that this was an obvious candidate for a couple of relays but I decided to investigate further, having first cleaned the connections with switch cleaner.
I removed the door speaker grille followed by three screws and disconnected the two connecting wires. At the bottom of the door, below the hole there are wires secured by a cable tie which I carefully removed with wire cutters.The block shown below connects to the window motor.
Having cleaned this with switch cleaner too I discovered even less voltage at this point! I think the reason is that the cable going to the door has to be thin enough to flex without breaking when the door is opened.
I had already sprayed silicone lubricant onto the rear window runner which is accessible from the top with the window down, and the front one via the speaker hole with the window up, but this had little effect. The motor is connected to the window lifter in the same manner as the windscreen wipers, i.e. an open sided tube with a spring spiral inside which rotates when the motor is in operation.
This is accessible without difficulty through the speaker hole, and without removing the door trim (which is exceedingly difficult to do). I lubricated this with copper grease throughout as much of its length as possible (you'll need the window up for this). After this simple treatment on my car the window goes up and down even quicker than it takes for the other one to go up.
Having done this I decided that relays were not really necessary, in any event the motor would still be straining against the friction if the above was not done.
Tips
- Don't forget to fit a new cable tie to replace the one removed.
- Never operate the window with hands or tools inside the door!
Find that elusive exhaust manifold leak
NB. Repoduced with the kind permission of Bob (PH: TVRBob). Thanks again Bob!
This task should take less that half an hour.
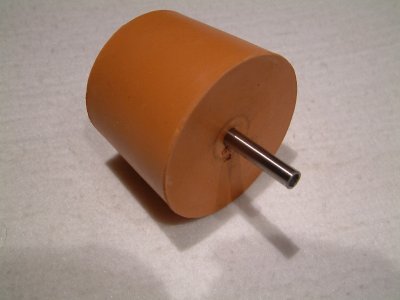
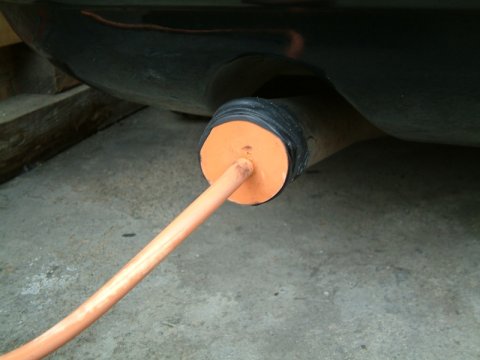
Exhaust leaks can sometimes be elusive. The problem is that the sound of the engine and exhaust makes it very difficult to focus in on the leak using ears alone. Detecting leaks by feel can be equally difficult as exhaust systems are hot and the leak is bound to be in an inaccessible place. A simple way to find these leaks is to create a reverse air flow with the engine shut down. The exhaust will be cold thus making it safer to handle and with the engine off it is far easier to hear where the air is leaking from.
The Method
The simple method requires a bung with a hole to be forced into the tail pipe. It is wise to seal the edges of the bung with some tape to prevent any leaks. Attach a pipe between the hole in the bung and a compressor. If you haven't got an air compressor you'll have to find a friend and ask him/her to blow down the pipe for you! Once the pipe is under pressure it's a simple case of listening for the leak. Once you have found the general area you can use a 20/80 mix of washing up liquid to water to dab the area with a paint brush. Your leak will be exposed by telltale bubbles.
This task should take less that half an hour.
Exhaust leaks can sometimes be elusive. The problem is that the sound of the engine and exhaust makes it very difficult to focus in on the leak using ears alone. Detecting leaks by feel can be equally difficult as exhaust systems are hot and the leak is bound to be in an inaccessible place. A simple way to find these leaks is to create a reverse air flow with the engine shut down. The exhaust will be cold thus making it safer to handle and with the engine off it is far easier to hear where the air is leaking from.
The Method
The simple method requires a bung with a hole to be forced into the tail pipe. It is wise to seal the edges of the bung with some tape to prevent any leaks. Attach a pipe between the hole in the bung and a compressor. If you haven't got an air compressor you'll have to find a friend and ask him/her to blow down the pipe for you! Once the pipe is under pressure it's a simple case of listening for the leak. Once you have found the general area you can use a 20/80 mix of washing up liquid to water to dab the area with a paint brush. Your leak will be exposed by telltale bubbles.

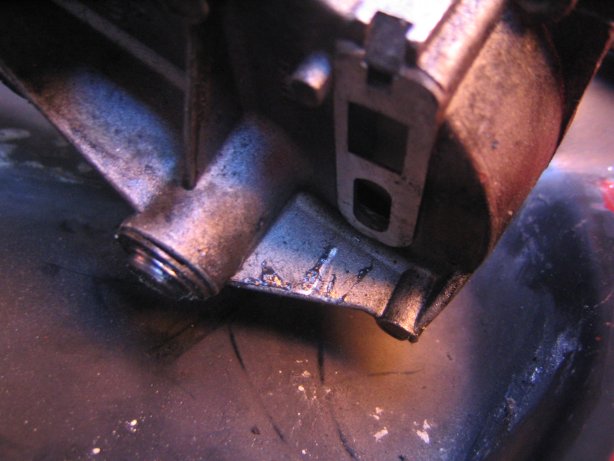
Changing the TVR Chimaera's 100 amp fuse
Subject of myth and legend - the elusive 100 amp fuse seems to have been the cause of numerous calls to the AA among TVR owners. Many are unaware of it's existence, and even those who of of it don't know where it is or what it's for.The fuse sits between the output of the alternator and the battery, it's exact purpose is unclear. I guess it's to protect the car in the event of a major failure of the alternator.
Finding it
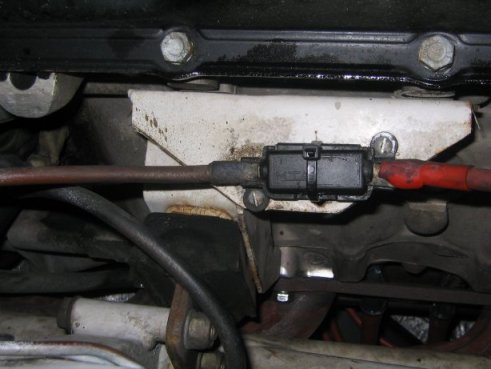
On my car (a '98 500) the fuse is located in a small black plastic box mounted onto the chassis. It's located under the car, near to the main chassis rail, on the off-side of the car around 18" back from the oil filter.
Finding it
On my car (a '98 500) the fuse is located in a small black plastic box mounted onto the chassis. It's located under the car, near to the main chassis rail, on the off-side of the car around 18" back from the oil filter.


Replacement
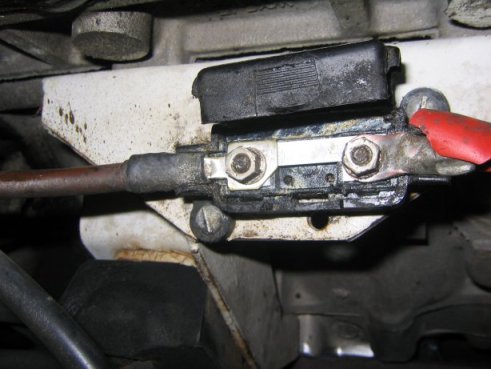
I snipped the cable tie which was keeping the lid closed and inside was what can only be described as a corroded mess. The first task was the removal of the old fuse.
NB. At this point you should probably disconnect the battery, you can probably get away with just being careful but there is ample opportunity to short out the battery against the chassis.
Removing the old fuse was just a matter of undoing the 2x 8mm nuts which hold on the alternator and battery connections. The old fuse should then just pull out.
Next I cleaned up the inside of the case, and then polished (with wet-and-dry paper) the terminal connections.
Replacement was just a matter of slotting in the new fuse and re-connecting the newly polished terminals. After a quick squirt of WD40 I put the lid back on and secured it with a new cable tie, some of the insulation looked a bit tired so I wrapped it up with insulation tape.
In summary
It's an easy job once you have the car on stands. It's not an easy road-side repair and so I think it should really be done annually to be on the safe side.
Tyres
|
The TVR Chimaera left the factory in Bridgestone S02 tyres, unfortunately these tyres are no-longer available. The S03 aren't as well regarded as the S02s and so most owners have looked elsewhere.If you to read the forums for advise you'll find general confusion and conflicting results. As such I've attempted to summarise some of the details here.
Speed Ratings All tyres carry a speed rating, this rating defines the maximum speed for which a tyre is intended. See table opposite. TVR Recommend that only 'Z' rated tyres are used, however due to limited availability many drivers use 'V' instead. If you go down this route it's worth informing your insurance company to be sure that it won't affect your cover. Tyre Alternatives Here are some of the more common tyre choices: Goodyear GSD3 Eagle F1 - Well respected, but not available for the front. Goodyear GSD2 Eagle F1 - Not as good as the GSD3s. Avon ZZ3 - Some positive results. Falken ZE512 - A budget tyre, not directional. Toyo Proxes T1 - Not 'Z' Rated (only V) Dunlop SP9000 - Well respected replacement. Suppliers These suppliers are worth a go, it might be worth seeing if they do a discount for TVRCC membership: Comments This is a big topic and there's a lot of info out there. If you have any tyre suggestions please let me know and I'll add them to the list with your comments. Thanks! |
|
Wiper park switch replacement
I started to have problems with my wipers during some light rain. I found that gently pushing up the wiper arm gave a useful single wipe. However after a while I starting having problems with the parking function. The wipers would park either flat in front of the driver or half-way across the screen.A quick check of the forums on Pistonheads revealed that this was likely to be the wiper park switch.
Sourcing the part
I wasn't really sure where to get the part, I guess I could have called the dealer or one of the specialists but I thought I'd try eBay on the off-chance. Searching for "wiper park switch" revealed a few options. Generally they were advertised as being suited to Minis, MGs, Jaguars for about 12GBP.However I spotted what appeared to be an identical switch for 4GBP, advertised as a part for a London Taxi! I won the auction and it is indeed the correct part!
Fitting
To start with it's worth parking the wipers in the middle of the screen (by turning off the ignition). This gets the cam lobe that activates the switch out of the way so that you don't break the switch while fitting.Loosening then wiper motor is pretty easy, just a couple of bolts hold a clamp in place. With this removed you can angle up the motor to access the switch. I made a quick note of the wiring before sliding the old switch out:
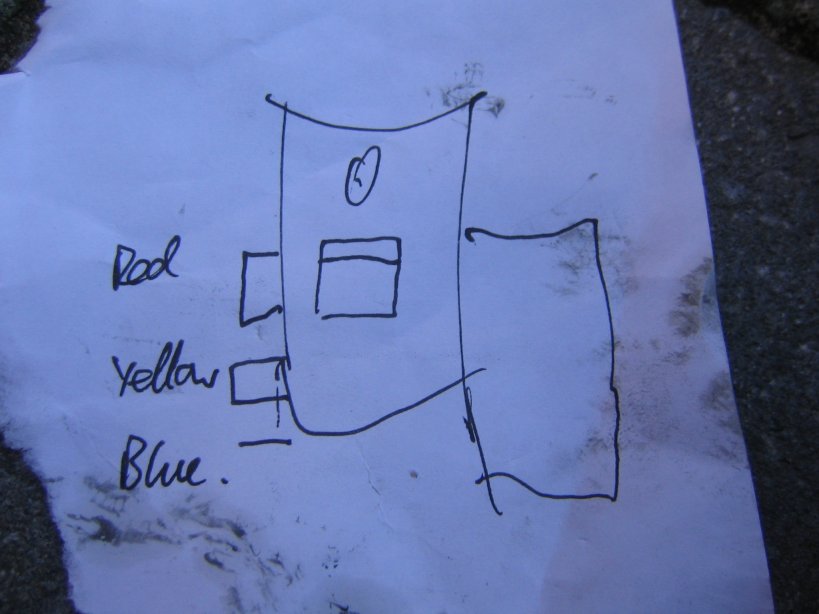
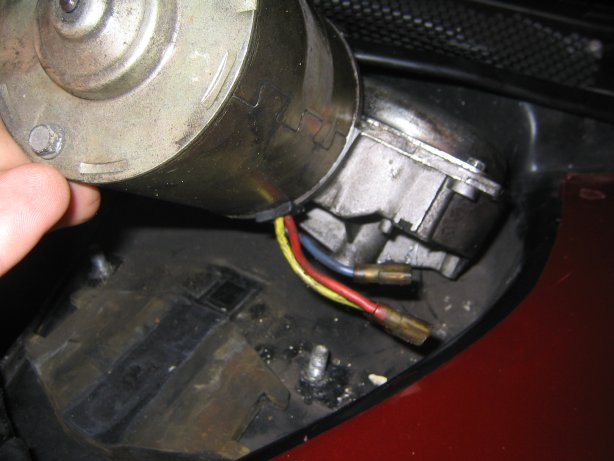


NB. Some people recommend putting some grease around the connections to prevent future water ingress. This is a good plan and I'll do it (once I have some grease).
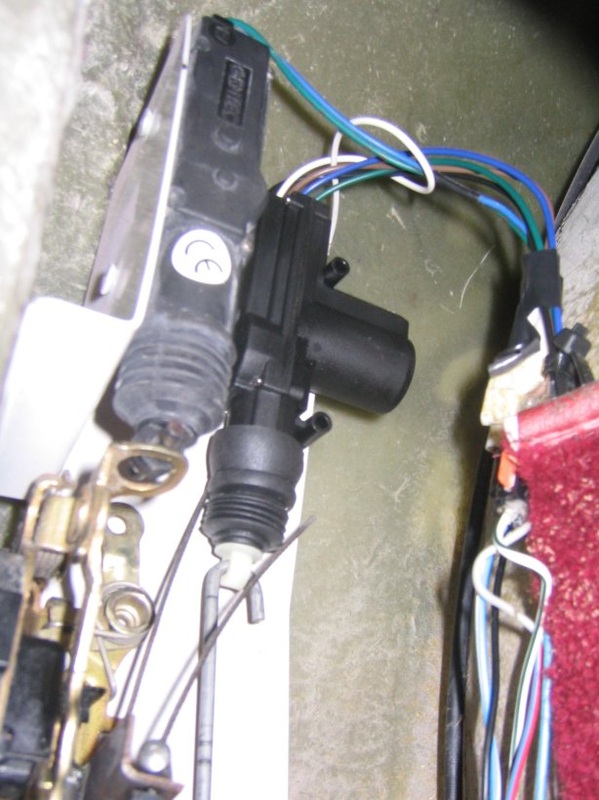
Door lock solenoid replacement
Shortly after buying my car I started to have problems with the driver's side door lock. Using the keyfob would lock the passenger side door and set the alarm but the driver's door could still be opened.I tracked the problem down to the door lock solenoid, the problem was intermittent and could be temporarily resolved by 'jiggling' the actuator. This would make it work for the next couple of cycles.
I checked the wiring and it seemed to be basically sound, I also checked the door open/closed switch but this was working fine.
A replacement solenoid can be sourced from Maplin. There are two types, a two wire (part number: YD79L) and a five wire (part number: YD78K). They cost about £9-10 each. The one I wanted to replace was the 5 wire version.
|
Replacement Process
The solenoids are mounted in a frame within the wing, behind the door. You can access this area by lifting up a carpet flap secured by velcro. Inside you can see 2 solenoids, one to open the door and the other to operate the lock. To remove the solenoid you need to loosen the frame. To do this just remove the 3 allen bolts in the door gap. The frame can the be rotated to give access to the screws holding the solenoids in place. Mine was slightly stuck with sealant but it came out okay with some gentle persuasion. Once the new solenoid is in place (don't forget to re-attach the actuator arm), you can replace the frame. Be careful to try and get it back into the same position so that the door shuts cleanly. |
|
|
Wiring
The solenoid I replaced was the 5 wire version, here's a table of the wiring that worked for me. It did take a bit of trial and error to get it right as the wire colours didn't match up. Note that both the old and new solenoids had one spare wire which was just taped off. |
|

|
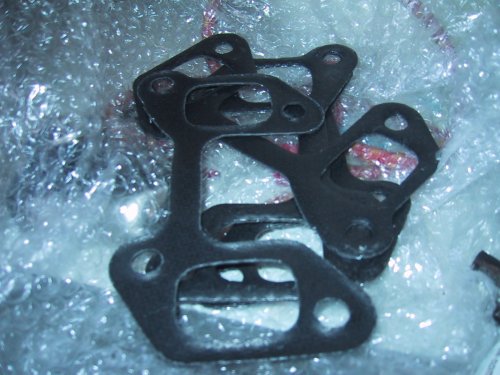
Manifold Gasket Change
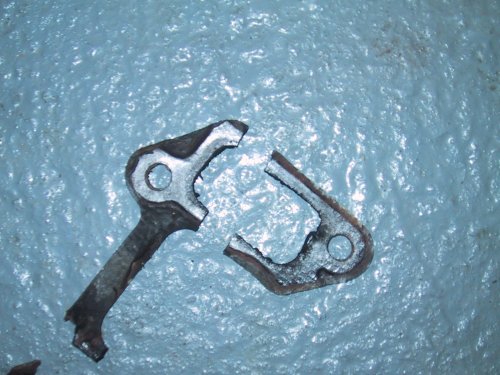
Having arrived for the hastily-arranged MOT after finding it had run out 4 days ago ( luckily the TIV isn't my daily runner ) I could hear a ticking noise coming from the engine. During the emissions test the MOT guy had been holding a rag into one of the exhaust pipes in an effort to get a good reading. He told me that with the large diameter of the pipes on TVRs the equipment struggled to get a representative reading. I smiled at him, he was one of those people who like you to know how knowledgable they are..."just pass the bloody thing"... I thought. By now the engine sounded like a Massey Ferguson. Luckily the car passed with just an "advisory" on the manifold leak. Having got her safely home what to do now ???
First, I went out into the garage to suss out whether it was a job I could tackle myself. Knowing that this was likely to cost £200-300 at a garage ( parts are cheap but the labour is 2hrs approx per side ) I rang Julian at Joospeed for advice ( thanks again Joolz ). He said it wasn't a techically difficult job but that some of the bolt were a right tw*t to get to. The other problem I found was I didn't have the right spanners ! You need a small 9/16th AF ring spanner and a combination 9/16th AF spanner. I duly ordered a set of AF combination spanners ( amazon.co.uk of all places - £11.00 !). I also ordered the gaskets, plus some new bolts with spring washers from Harrogate H.C. as Joolz had run out.
Came the weekend and the spanners duly arrived - but no sign of the gaskets - bugger ! Ah well at least I can tackle the manifold removal. First job was to lube up the bolts and especially the big stainless clamp at the other end of the manifold. Jim at HHC warned me that these sometimes stick together and need some persuasion to come apart. WD40 it was then coz I'd run out of Penol.
The top bolts are fairly easy to get out. I moved the black plastic plenum pipe out of the way, took off all the spark plug leads and removed the dipstick Having removed the top bolts came the worst task...the bottom ones. I'd been told that you need to get under the car to remove these. So up she went on the axle stands - what a waste of time this was. You can see bugger all of the manifold from underneath - especially when you only have axle stands. I subsequently found that you CAN get to all the bolts from the top, it you have smallish hands like me. Although I was lucky that most of the bolts weren't stuck in really tight .
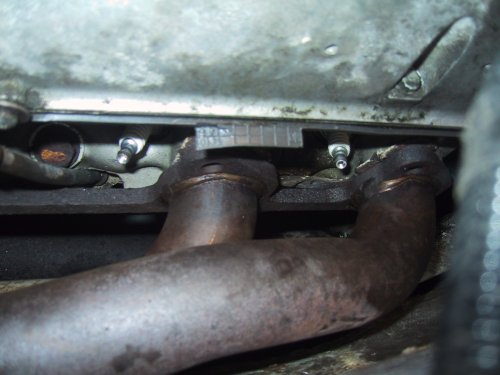
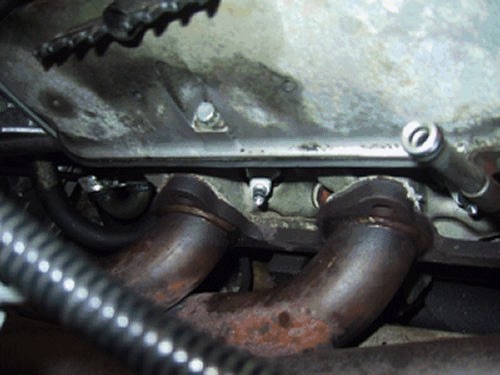

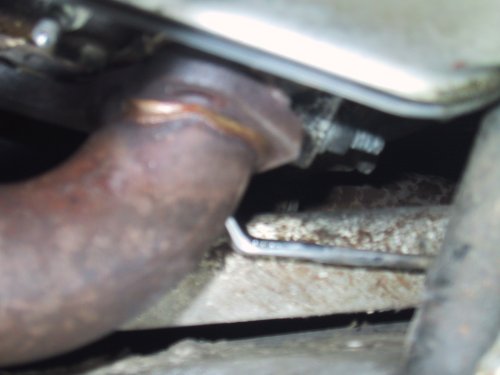
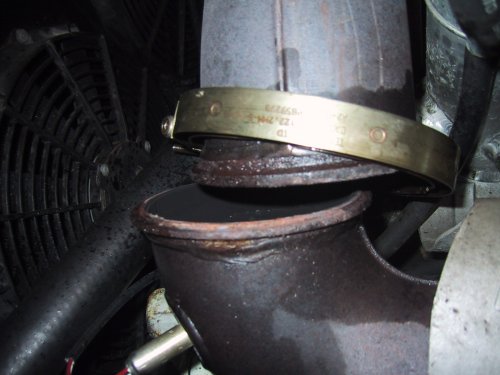
This was a bit of a cow and need a little judicious clouting with a piece of wood to persuade it to come apart. I cleaned the faces and then went on to clean off all the old gasket material from the manifold and the faces on the head.
Sunday came around and I began to think that maybe Royal Mail were playing their old trick of taking my parcel to the post office round the corner and not leaving a card. This turned out to be the case - b*rst*rds - could have had it finished yesterday.
Jim from HHC had come up trumps again and the whole lot - 4 double gaskets, all the bolts and spring washers for both sides came to about £35 inc delivery.

Refitting took about 1 hour - the worst bit is trying to juggle the loose manifold whilst getting a bolt through a hole with a gasket the other side and then holding it all whilst you start the bolt without dropping the lot in the engine bay......phew. I suggest you get the bottom one right at the back ,cylinder 7, started first then cylinder 5's top one then cylinder 1 top and then cylinder 3 bottom. you can then wind these in to roughly where it wants to be. Then get the other 4 bolts started and proceed to fasten the big stainless clamp at the other end.
Now it's just a job of carefully tightening everything up being careful not to damage the gaskets.
As my manifold gasket went ( I think ) due to what transpired at the MOT I am holding off on doing the other side gasket just now as it's seems to be just fine thank you. I have all the parts and now the knowledge to change that side if they go later.
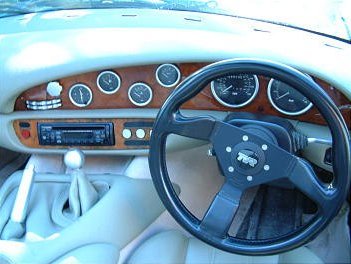
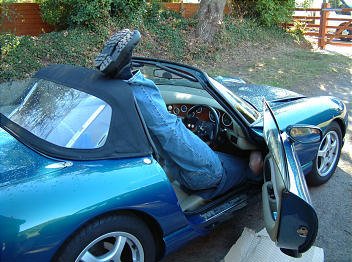
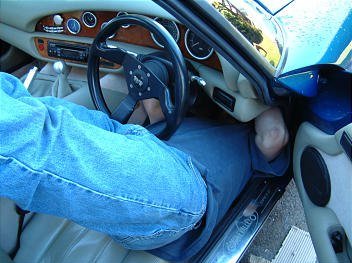
Dashboard replacement
I decided to replace my cracked old wooden dash with a nice new shiny stainless one from Leven in the chequerboard pattern. The only problem was, do I fit it myself or pay someone for the privilege? I thought that the hardest part would be removing the top of the dash itself and that elusive 3rd bolt. At the weekend I decided to give it a go myself and here's how it went. Don't forget to disconnect the battery before you start!
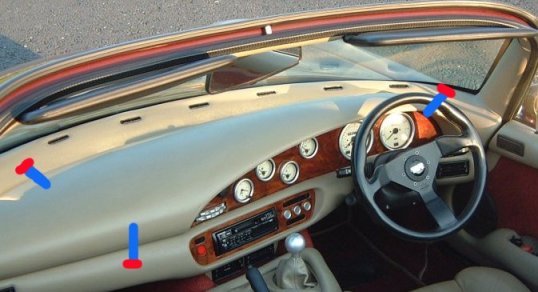
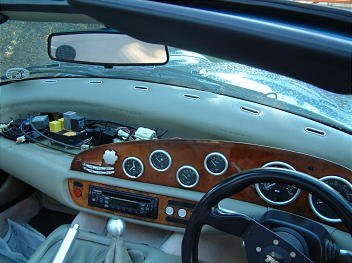

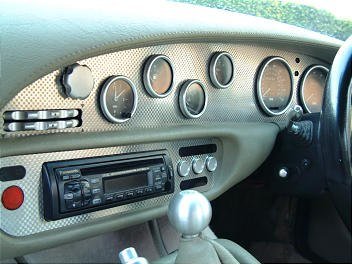
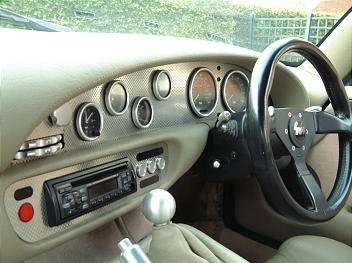
It looks daunting but its not too bad. The red markers indicate the nuts which need to be removed. You'll also note that the bolts face in contradictory directions meaning that it's impossible to remove the dash top without flexing it.
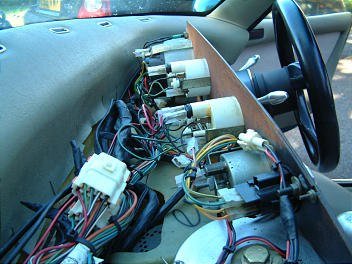
When the dash top is off, make sure that you remove one clock at a time, labelling it and drawing a sketch of the location of the spade connectors behind it as you go along. The dash itself then simply pulls up from 4 slots in the shelf below.
The only tricky part is pulling out the horizontal heater dials as a complete unit and removing the 3 small screws (1 top and 2 bottom) which secure the small unit to the dash itself.
Replacing this part was straightforward and the only bits that needed re gluing were the 3 warning lights which are between the Speedo and Rev Counter.
The small radio panel was the most difficult bit to replace and indeed was the only part that needed the 4 old fixings to be reused and re glued. You have to be careful here because they must go back in exactly the same place.
Refitting is a little fiddly with the 2 block connectors behind which hold the warning lights on one end and the hazard warning lights on the other.
Once they are all together again, check that all the bulbs and dials are working correctly then refit the top of the dash.This has to be tilted backwards and the elusive 3rd bolt on the drivers side needs to be located in its holes first then the other 2 will simply slot back into place.
Reconnect the battery and away you go.